Introduction
In a previous activity, students used the software program Pix4D to process a set of UAS imagery. This imagery did not contain GCPs. For this exercise, students will process the same imagery using Pix4D, however, this time the imagery will include GCPs. GCPs, or Ground Control Points, are characteristic points whose coordinates are known and are used to georeference a project and reduce the noise. The maps that are generated in this exercise will be qualitatively compared to the maps that were produced in the previous Pix4D exercise.
Methods
The methods for this exercise are very similar to the methods of the Processing Imagery Using Pix4D activity up through Step 8: Processing (Part 1). It is from here that the methods will be more thoroughly documented for this exercise and the steps leading up to this point will simply be skimmed through.
This exercise uses the same imagery -- Litchfield 1 and Litchfield 2 -- for processing, and the initial setup of the project is identical to that of the previous Pix4D project with the exception that the project is given a different name and saved to a different folder. The steps for the initial setup of the project includes the following:
- Naming the project and selecting a folder to save it in
- Adding images (Litchfield 1 and Litchfield 2)
- Editting the camera model (switching the 'Shutter Model' from 'Global Shutter' to 'Linear Rolling Shutter')
- Selecting the template ('3D Maps' option)
- Unchecking step 2 and 3 in the map view (only step 1. Initial Processing should be checked)
Now it is time to begin working with the GCPs.
Step 1: Open the GCP Manager window
 |
| Figure 1: GCP/MTP Manager window |
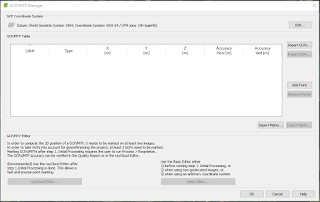
Click on 'Project' in the upper left corner and select 'GCP/MTP Manager...'
This will open the GCP/MTP Manager window (Figure 1)
Step 2: Import the GCPs
 |
| Figure 2: Import Ground Control Points window |
Click on 'Import GCPs...' (upper right side of figure 1)
Next, referring to figure 2, click on the tab next to 'Coordinates Order' and select the 'Y, X, Z' option
Then, click on 'Browse...' and find the GCP file associated with the Litchfield imagery and select it.
Finally, click 'OK' and if all went well, blue plus signs should appear on the map view in the correct area (these are the GCPs)
Step 3: Run initial processing
 |
| Figure 3: Initial processing |
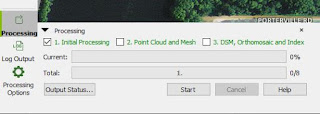
Once the GCPs have been imported, initial processing can be started after unchecking steps 2 and 3 in the lower left corner (Figure 3)
Step 4: Edit GCPs using the Ray Cloud Editor
 |
| Figure 4: Ray Cloud Editor |
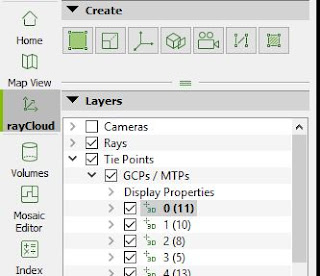
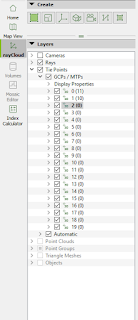
After initial processing is complete, the GCPs can now be edited using the Ray Cloud Editor. Click on the 'rayCloud' tab on the left side of the screen and uncheck 'Cameras' under the 'Layers' section (Figure 4)
As can be seen in figure 5 under 'Display Properties', there are 20 GCPs that are available to edit. Start with GCP number '0' by clicking on it which will bring up the 'Selection' and 'Images' tabs on the right side of the screen (figure 6). The GCPs must now be found in each image (the squares with
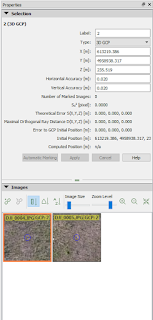 |
Figure 6: Selection and Images
tabs prior to editing |
 |
| Figure 5: GCPs of image |
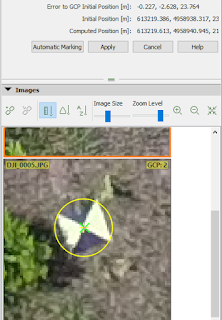
black and white triangles opposite of each other). Under the 'Image' tab, select an image by clicking on it and locate the GCP within the image. Once located, click on the center of the GCP where the white and black triangles meet then under the 'Selection' tab, click on apply. Repeat this process for another image, however this time, after clicking on the center of the GCP, the 'Automatic Marking' button under the 'Selection' tab should become available to select. Click on 'Automatic Marking' and the remaining images under the 'Images' tab should automatically select the GCPs that remain. Check each image to make sure that this has happened. The GCP in each image should have a green 'X' in the center with a yellow circle around the outside of it (figure 7). Repeat this process for the remainding 19 GCPs.
 |
| Figure 7: Marked GCP |
Step 5: Complete the Processing
 |
| Figure 8: Processing steps 2 and 3 |
After the GCPs have been edited using the Ray Cloud Editor, the remaining processing can be run. Select processing options 2 and 3 in the lower left side of the screen and click 'Start' (figure 8). After processing is complete, the resulting orthomosaic and and DSM should be of high quality which can then be used to make maps in ArcMap.
Results/Discussion
 |
| Figure 9: Litchfield Sand Mine with GCPs |
 |
| Figure 10: Litchfield Sand Mine without GCPs |
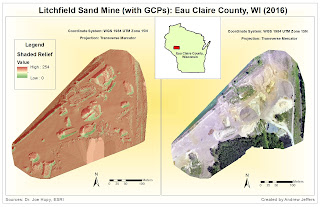
Comparing the map of the mine with GCPs (Figure 9) to the one created in the previous lab that does not contain GCPs (Figure 10) it is fairly clear to see that the images in figure 9 are sharper than those in figure 10. In both maps, on the left side is a hillshaded DSM with a 30% transparency value overlaid on top of the DSM, and on the right side is an orthomosaic. On the DSMs, green areas represent lower shade while red areas represent higher shade. Figure 9 is much smoother and less "gritty" compared to figure 10. The data quality overall appears to be much better in figure 9.
 |
| Figure 11: Quality check with GCPs |
 |
| Figure 12: Quality check without GCPs |
Another way to compare the quality between the imagery is by looking at the 'Quality Check' produced by the Quality Report of each project (figures 11 and 12). The 'Georeferencing' section receives a better check in the report with GCPs compared to the report without GCPs while the 'Camera Optimization' also receives a better score by 1.06%.
Finally, looking at the 'Ground Control Points' section of the report with GCPs, the RMS Error for the X, Y, and Z values are no higher than 0.038 which is very efficient.
Conclusion
It's clear to see that including Ground Control Points while processing UAS imagery and using the Ray Cloud Editor in Pix4D produces much better results as opposed to not including the GCPs. While the process of including the GCPs and editing them can be somewhat tedious, the extra time and effort of working with them is worth it in the end for the high quality orthomosaics and DSMs that Pix4D produces.


No comments:
Post a Comment